Workflow Builder
Purpose
Use the Workflow Builder to design approval workflows visually. Drag components onto a canvas, connect them, choose who approves and how, then publish the workflow, save it as a reusable template, or send it straight out for approval.
Prerequisites
- You are signed in to EisenVault One.
- Workflow features are enabled in your environment.
- Your account has permission to create or run workflows.
Environment availability
In non-production environments (staging and development):
- Workflow appears in the left navigation.
- Start workflow is available on document option menus.
In production builds, those entry points are hidden. Manual workflows can still be started only where your deployment exposes workflow routes.
Open the Builder
Click Workflow in the left navigation, then choose one of:
| Button | Opens | Use it for |
|---|---|---|
| + Create Workflow | Builder, bound to real folders and people | A workflow you intend to run |
| Create Template | Builder in Blueprint mode | A reusable structure; folders, users, and files are filled in when you deploy |
Canvas Layout
| Area | Contents |
|---|---|
| Left panel | Searchable component list, grouped into Automation, Manual, and Approvals |
| Top bar | Workflow Name, save state, Discard, and the action button |
| Center canvas | Grid workspace where you place and connect components, with undo/redo and zoom controls |
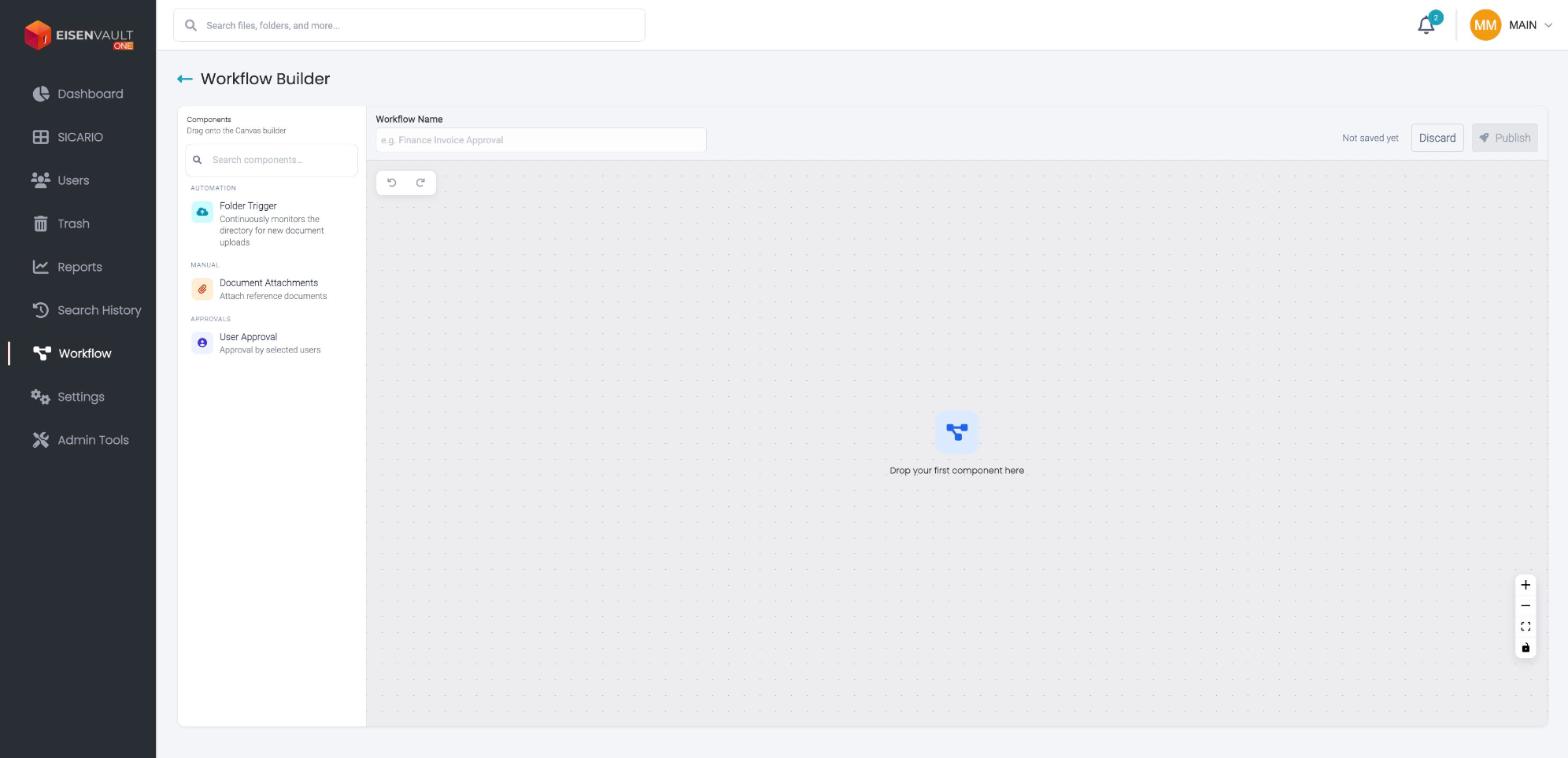
Drag a component from the left panel onto the canvas. An empty canvas prompts Drop your first component here.
Components
| Group | Component | What it does |
|---|---|---|
| Automation | Folder Trigger | Continuously monitors a directory for new document uploads |
| Manual | Document Attachments | Attach reference documents |
| Approvals | User Approval | Approval by selected users |
The action button
The button in the top right changes with what you have built:
| Button | When it appears |
|---|---|
| Request approval | A manual workflow — approvals with no Folder Trigger |
| Publish | An automated workflow — a Folder Trigger is on the canvas |
| Save template | Blueprint mode, opened from Create Template |
Discard throws the design away. The top bar also shows the save state — Not saved yet or Unsaved changes.
Build an Automated Workflow
An automated workflow starts on its own whenever a document is uploaded to a location you choose.
- Click + Create Workflow.
- Enter a Workflow Name.
- Drag Folder Trigger onto the canvas and configure its trigger location.
- Drag User Approval onto the canvas.
- Connect the two by dragging from the handle on one component to the handle on the other.
- Configure the approval step.
- Click Publish.
Build a Manual Workflow
A manual workflow is sent out once, for documents you choose.
- Click + Create Workflow.
- Enter a Workflow Name.
- Drag Document Attachments onto the canvas and add at least one document.
- Drag User Approval onto the canvas and connect it to the attachments.
- Configure the approval step.
- Click Request approval.
Component Configuration
Double-click any component on the canvas to configure it.
Folder Trigger
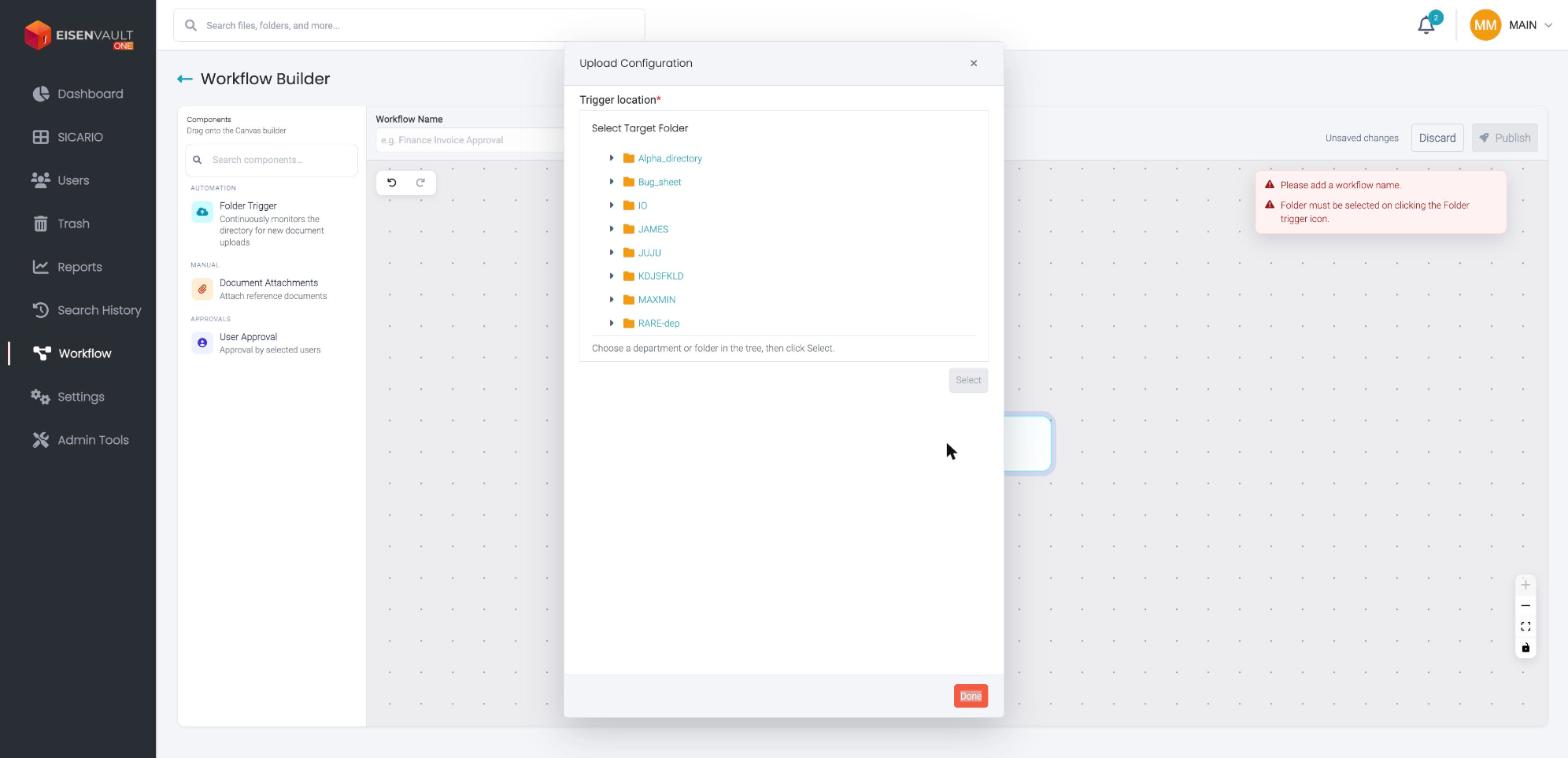
Opens Upload Configuration. Expand the tree, choose the department or folder to monitor, and click Select — the hint reads Choose a department or folder in the tree, then click Select.
A trigger location is required, so the workflow cannot be published until one is set.
Document Attachments
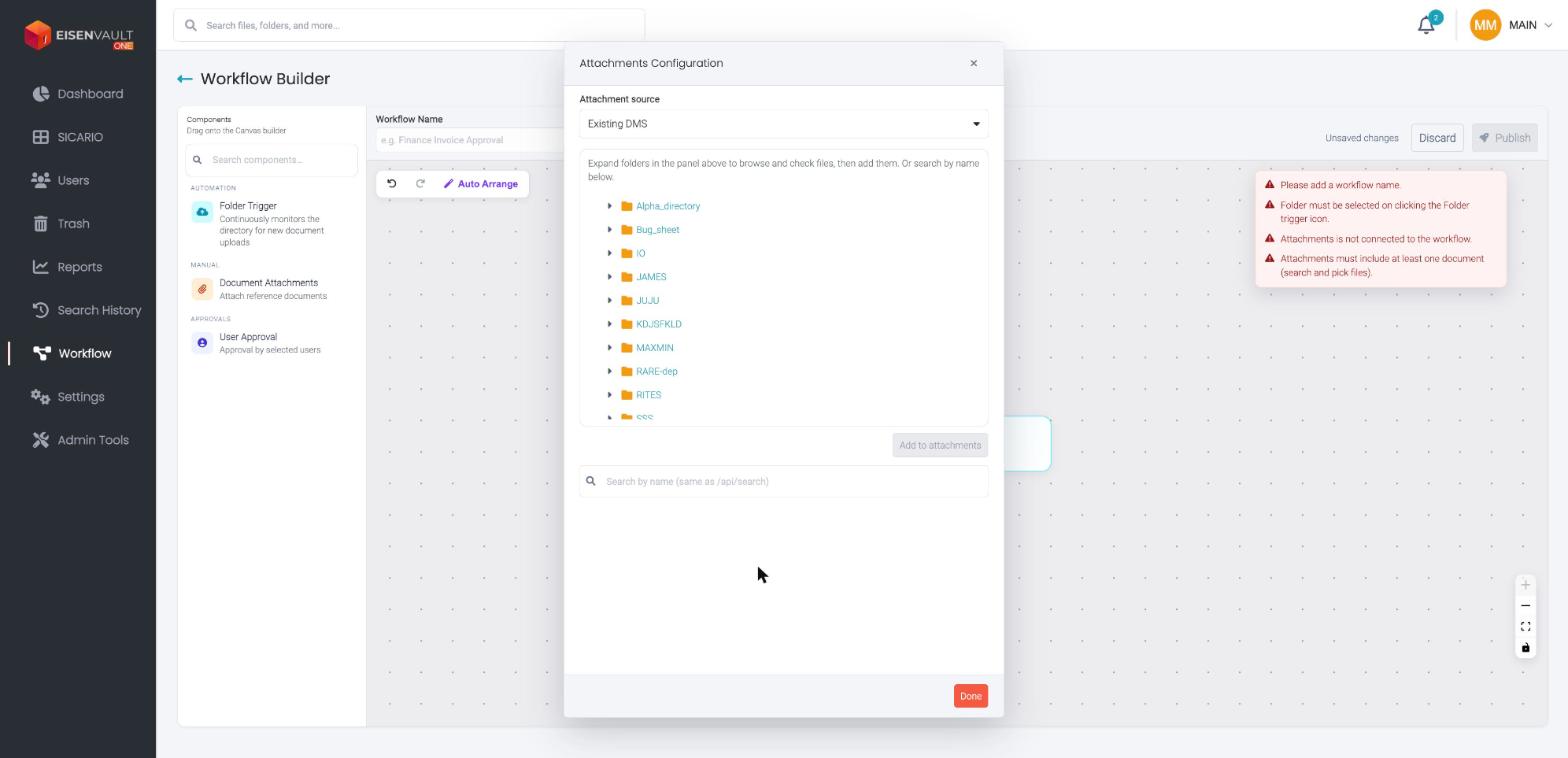
Opens Attachments Configuration. Choose an Attachment source, browse the folder tree or search by name, then click Add to attachments.
Approval Step Settings
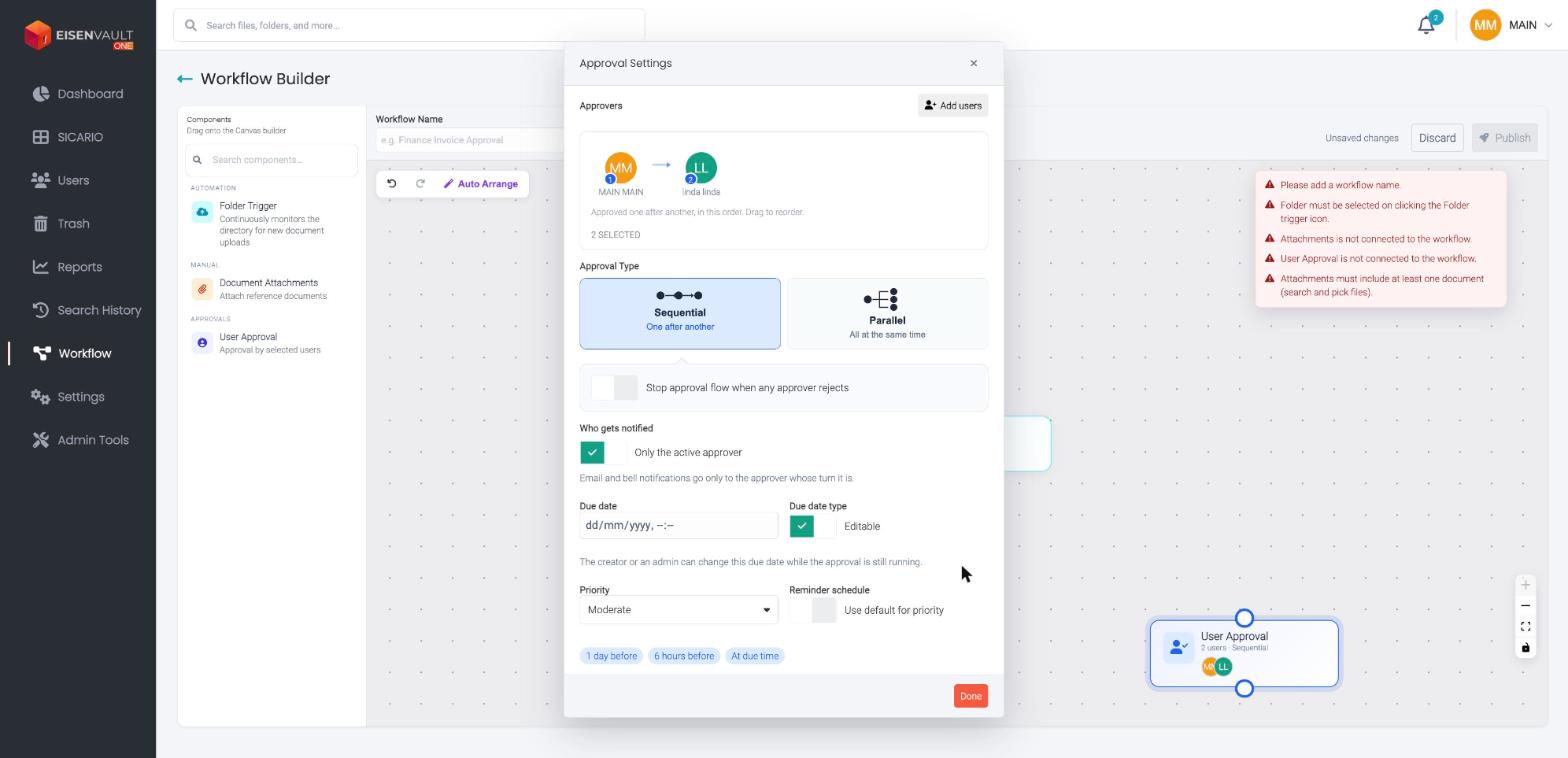
Double-click a User Approval component to open the Approval Settings dialog. Click Done to close it.
Approvers
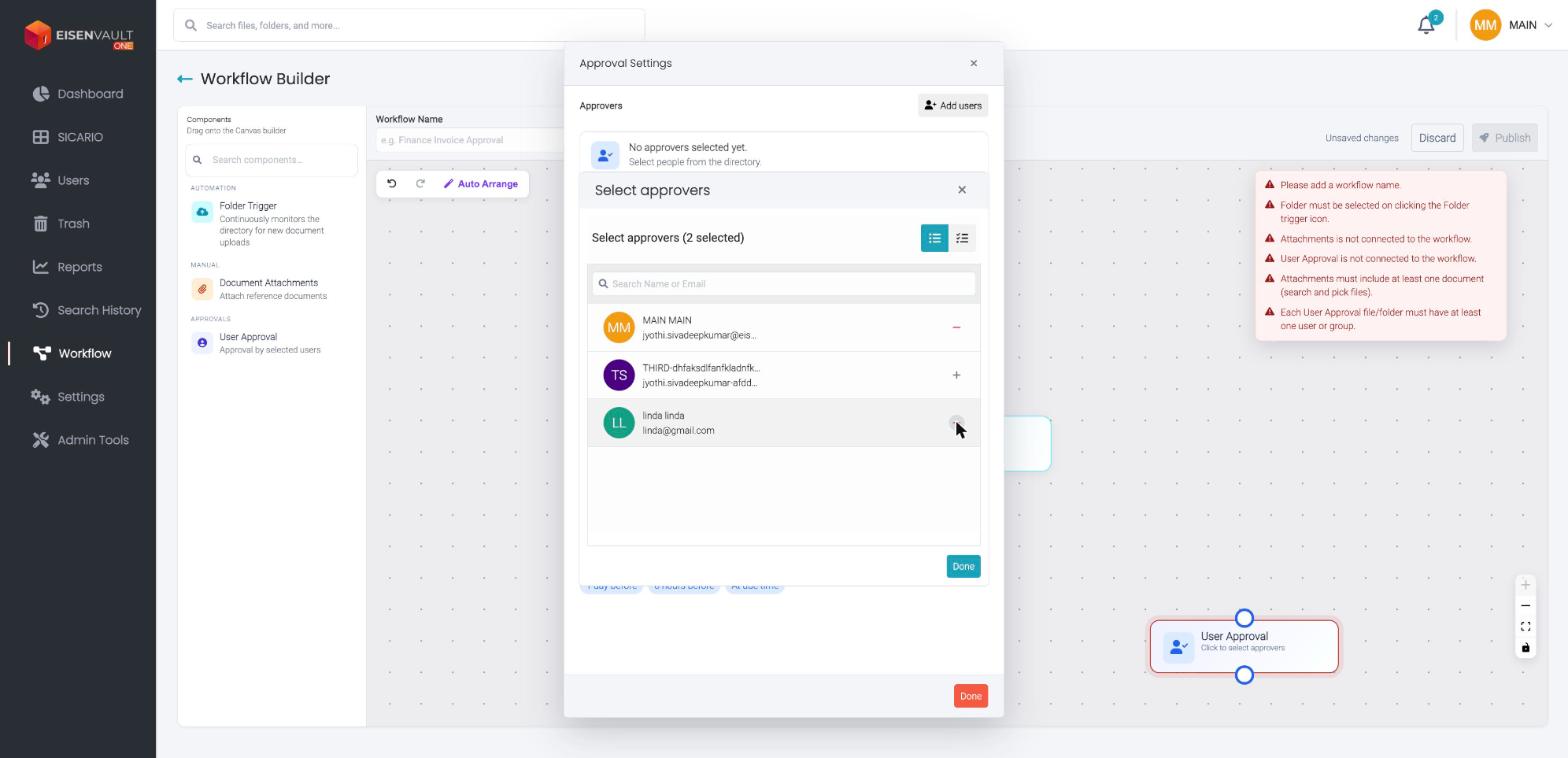
Click Add users to open the Select approvers dialog. Search by name or email, click + beside each person, then click Done. The heading tracks your progress — for example Select approvers (2 selected). A toggle in the top right switches between list and compact views.
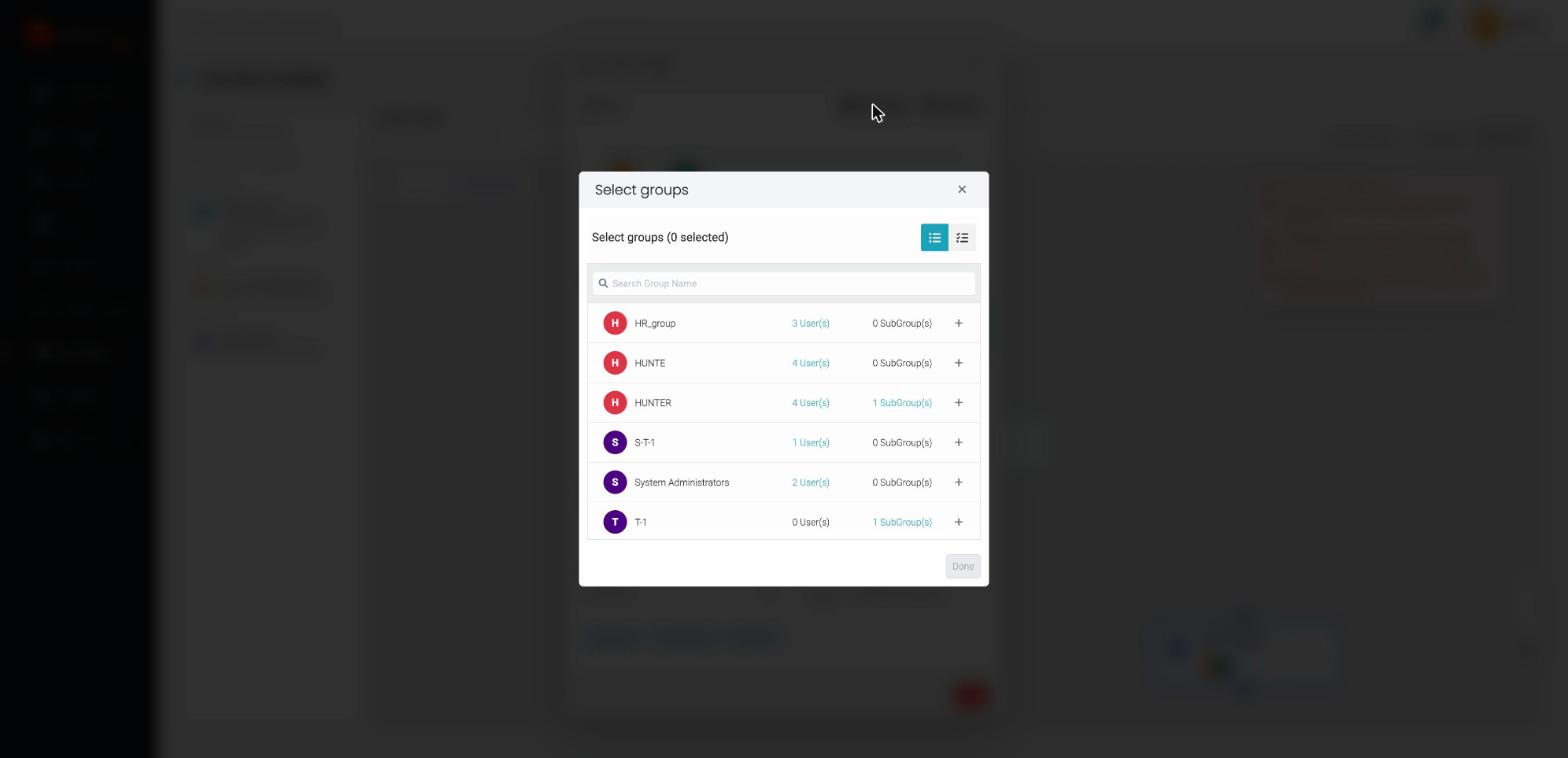
In Parallel mode an Add groups button appears alongside it. The Select groups dialog lists each group with how many users and subgroups it holds.
Until you pick someone the panel reads No approvers selected yet. Select people from the directory.
Approval Type
| Type | Behavior |
|---|---|
| Sequential | One after another — the next approver receives a task only after the previous step completes. |
| Parallel | All at the same time — every selected approver receives a task simultaneously. |
For Parallel steps a How many must approve? stepper appears. Use − and + to set the number of approvals needed before the workflow moves on. The hint reads Add users or groups to see how many approvals are required. Each group counts as 1, so the stepper stays empty until you have added approvers.
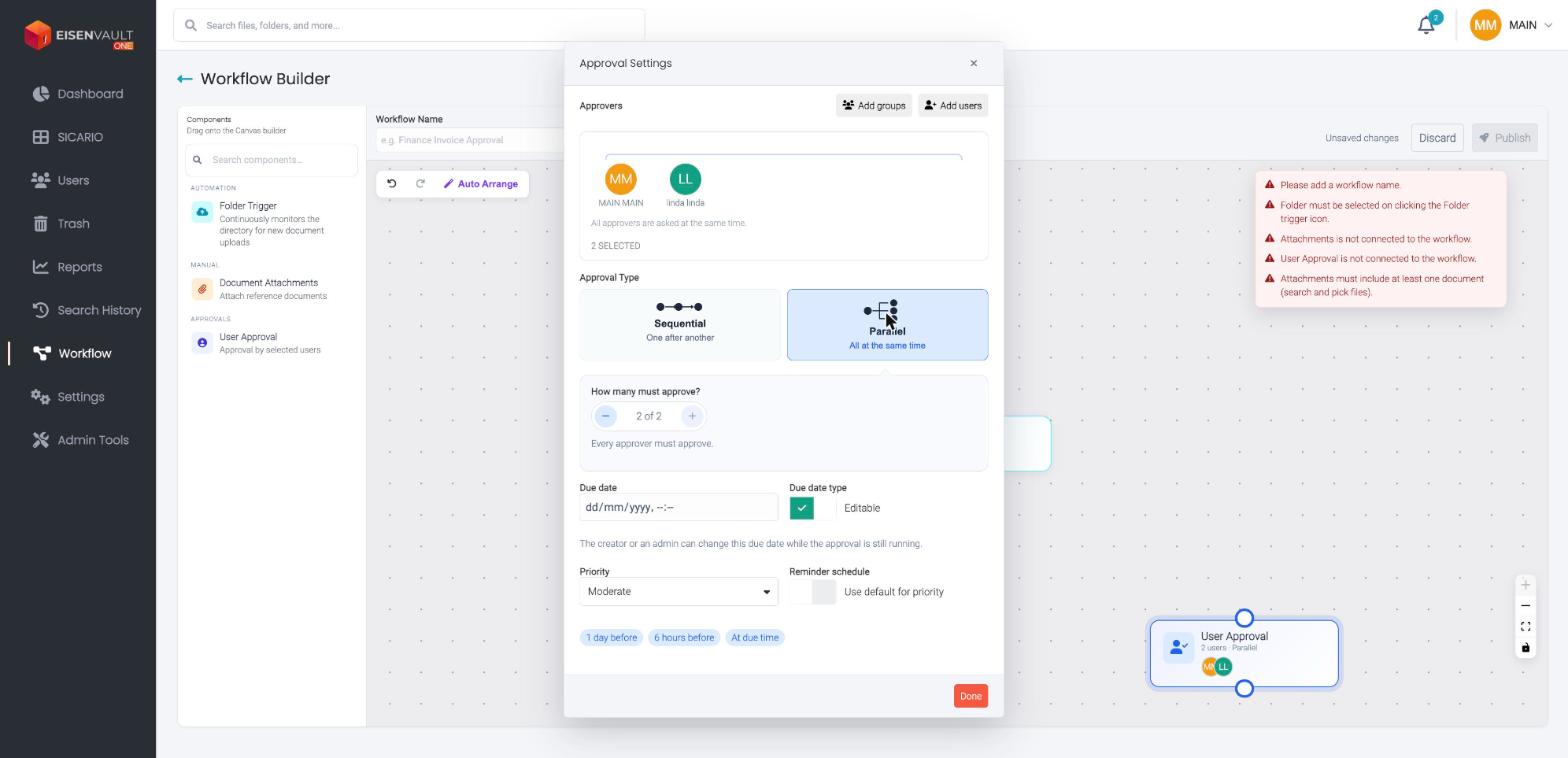
Two things change when you switch to Parallel:
- Add groups appears next to Add users. Groups can only be used with Parallel.
- Stop approval flow when any approver rejects is hidden, because that setting only applies when approvers act one after another.
Stop approval flow when any approver rejects
Available on Sequential steps. When switched on, the workflow stops immediately after the first rejection and the remaining approvers' steps are marked Skipped / No longer required.
Switch it off when you want every approver to record a decision even after someone has rejected — for example when you need the full set of responses for an audit.
Who gets notified
Controls who receives email and bell notifications as the workflow moves along.
| Option | Who is notified |
|---|---|
| Only the active approver (default) | Only the approver whose turn it is. The hint reads Email and bell notifications go only to the approver whose turn it is. |
| Everyone in the workflow | Every approver in the workflow, plus the requester, at each step. |
Choose Everyone in the workflow when all participants need to follow progress. Leave it on Only the active approver to keep inboxes quiet on long approval chains.
Due date and due date type
Set the date and time the approval should be completed, then choose how firm it is:
| Type | Behavior |
|---|---|
| Editable (default) | The creator or an admin can change this due date while the approval is still running. |
| Locked | The due date is locked once the approval starts — nobody can change it. |
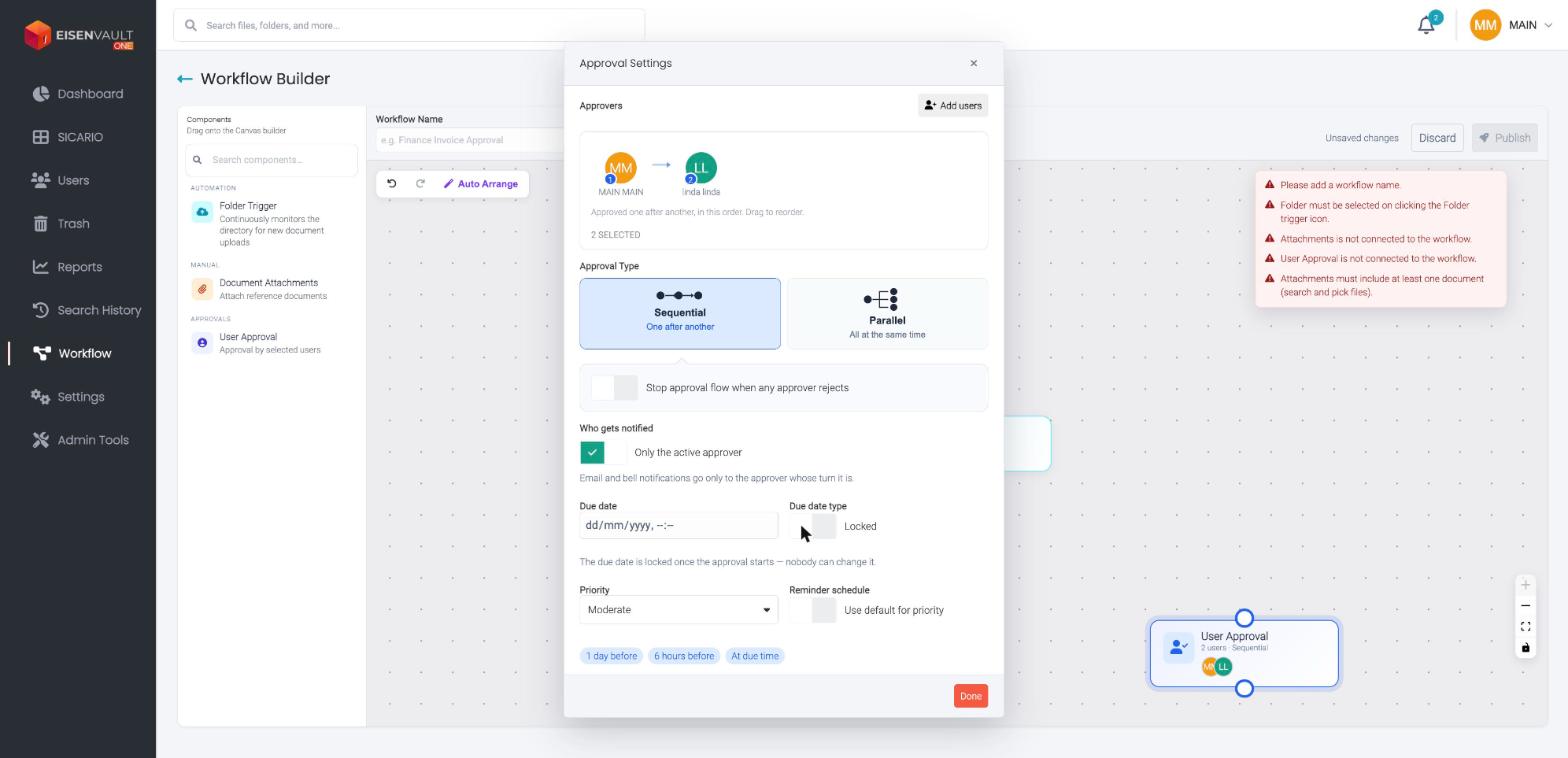
Important: once an approval passes its due date it can no longer be completed. Approvers see This approval is past its due date and can no longer be completed. With Editable, extending the date reopens the approval; with Locked, it cannot be reopened. Choose Editable unless the deadline is genuinely fixed.
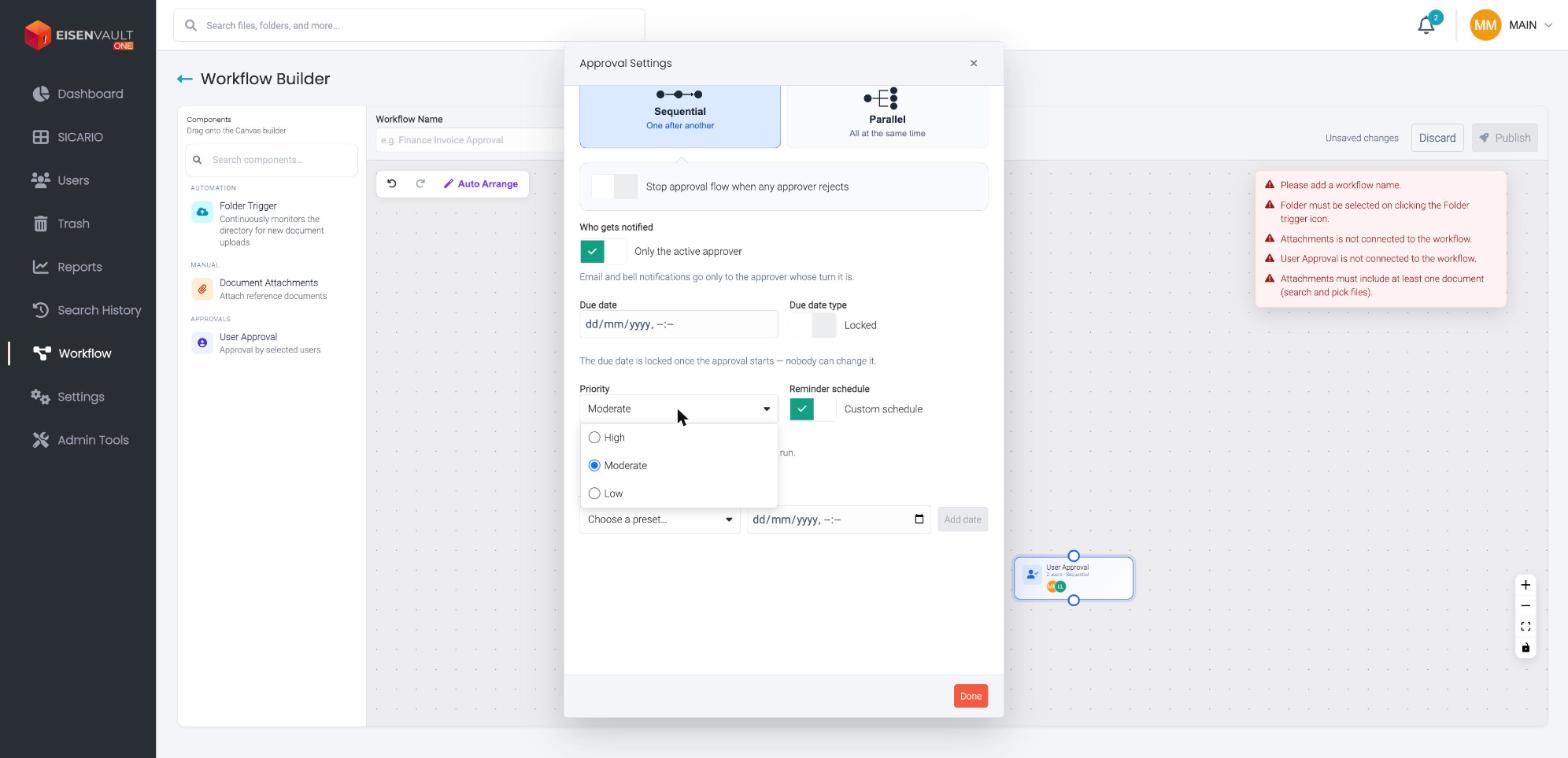
Priority
High, Moderate, or Low. Priority also sets the default reminder frequency.
Reminder schedule
Reminders notify approvers before an approval falls due.
Leave the toggle on Use default for priority and EisenVault One shows the reminders it will send as chips — for example 1 day before, 6 hours before, At due time.
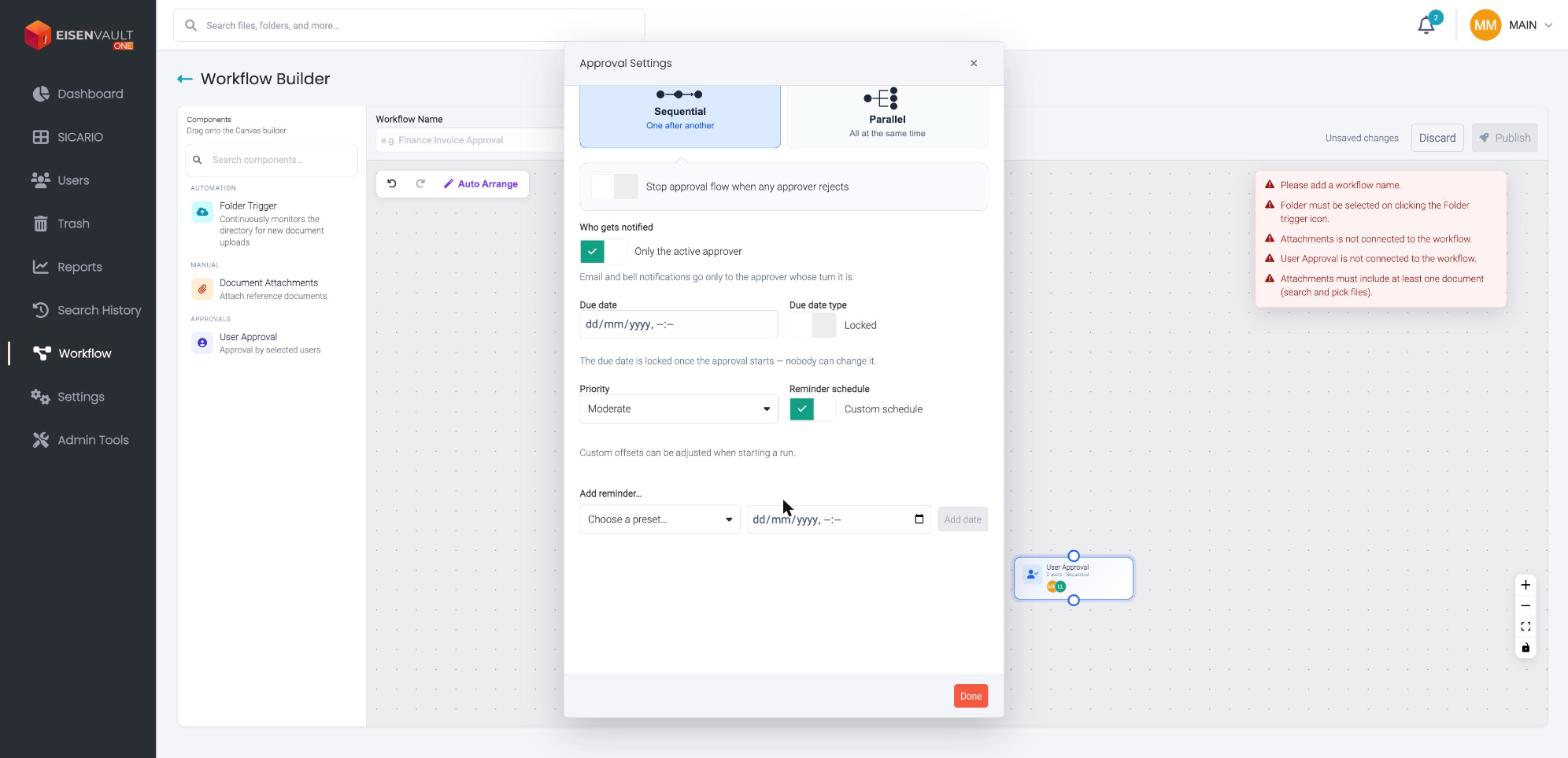
Switch the toggle off and it changes to Custom schedule, replacing the chips with an Add reminder… control and the note Custom offsets can be adjusted when starting a run.
Validation
The builder checks your design as you work and lists whatever is still missing in a panel on the right, for example:
- Please add a workflow name.
- Folder must be selected on clicking the Folder trigger icon.
- User Approval is not connected to the workflow.
- Each User Approval file/folder must have at least one user or group.
- Attachments must include at least one document (search and pick files).
The action button stays disabled until every item clears.
Expected Result
- Components are connected on the canvas in the correct execution order.
- Selected approvers appear in the Approval Settings dialog with a count.
- After Publish, uploading a file to the trigger location starts the workflow automatically.
- After Request approval, a new run appears under Running Workflows.
- After Save template, the blueprint appears under Library Templates, ready to deploy.